
In the part one of the article series I’ve introduced the very basics of mobile application development that is a preparation of mobile application development environment. I’ve also introduced the technology that will be used in all the series of “Mobile Application Development: Can I do it?”. The chosen technology is Java 2 Platform, Micro Edition (J2ME) and NetBeans IDE (Integrated Development Environment) as our development tool. Both products are FREE for commercial and non-commercial use allowing everyone to start mobile development immediately without spending a single dollar. After reading the part one of the article series, many of you tried the sample projects provided together with NetBeans 4.1. Base on the initial input I've received it seems that many of you got surprised with impressive results that can be achieved with only short Java code. You also start asking “How to make my own J2ME project using NetBeans?” or “How to transfer builded application to my mobile phone?”. The second part of the article series provides step-by-step answer to both questions.
In the next four parts of the series I’d like to focus on the fun part of a mobile application development which is making mobile games. I’ll show how to build a simple, yet interesting game step-by step, from very basic code, graphics up to the code optimisation and fully working game.
Let’s start
The very early stage of mobile game development is usually a creation of a very basic template (skeleton) type of our game code. Such skeleton code includes the basic functions of our mobile game such a handling graphics, control of the game by the users, control of application lifecycle. Thus, in our earliest J2ME game coding we will create our first MIDlet – that’s how we name Java 2 program on embedded devices.
In the first step let’s create new project in NetBeans IDE. Start the NetBeans IDE and select File -> New Project (or use keyboard shortcut Ctrl+Shit+N). A New Project wizard will appear. Figure 1. New project wizard.
In the first choice we have to choose the type of project. The best option for creating a mobile game skeleton project is to select
In the next menu set the name for the project i.e. MyFirstGame and the location of the project where all project files will be stored. For the purpose of this article please do not select the “Create Hello MIDlet” option, as we will create MIDlet ourselves. Click Next.
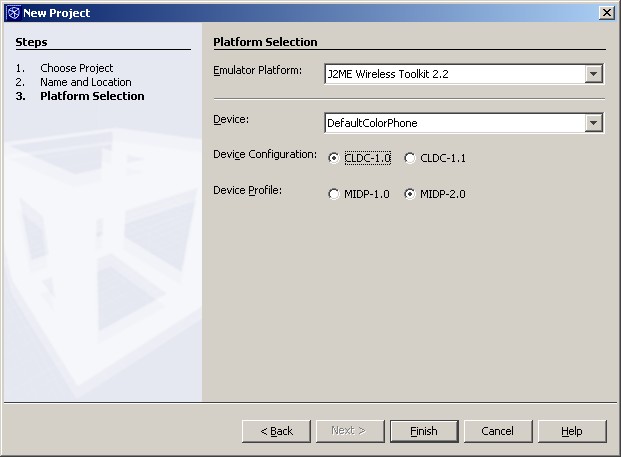 Figure 2. Platform selection in a New Project wizard.
The important options to configure at this stage are Device Configuration and Device Profile.
In the first Device Configuration setting the CLDC stands for Connected, Limited Device Configuration. In general it is part of framework that provides the most basic set of libraries and a virtual-machine feature that allows our MIDlet to run on the device. It is designed for resource-constrained devices such as smart phones, PDAs and small electronic equipment. There are currently two CLDC specifications available, version 1.1. (JSR 139) and the first release version 1.0 (JSR 30). At this stage you need to check which version is supported by mobile phone that you want to use in application development. My device is Sony-Ericsson P900 and by referring to the documentation I checked that it supports CLDC version 1.0. Thus, my option for Device Configuration is CLDC-1.0.
Second important setting is a Device Profile, available in two options MIDP-1.0 and MIDP-2.0. MIDP stands for Mobile Information Device Profile, and is also part of the J2ME framework, that together with CLDC enables Java on your mobile phone. By referring to documentation I checked that my SE-P900 phone supports MIDP-2.0 thus this will be my option. MIDP-2.0 provides lots of new and very useful features, which will make our game development much easier. Unfortunately, if your mobile phone does not support the new MIDP-2.0, some parts of the code provided in this article may not be supported on your mobile phone (especially GameCanvas related). You will be able to work on your mobile application in NetBeans but it will be a problem to make it work on your MIDP-1.0 phone.
After clicking Finish, MyFirstGame project will be ready for development.
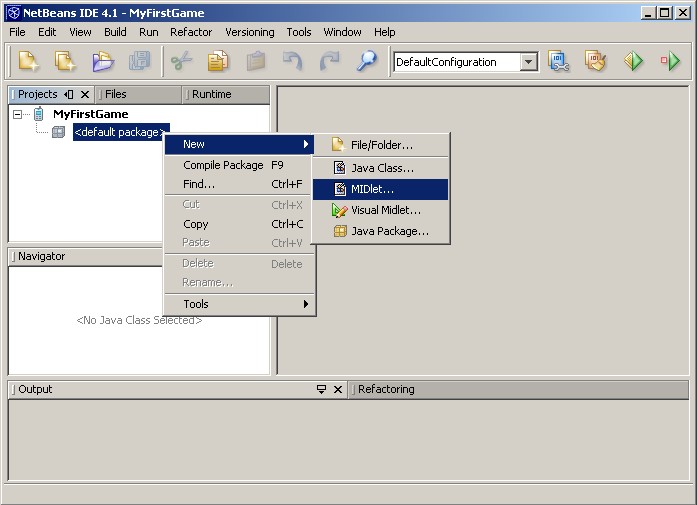
Figure 3. Creation of New MIDlet.
As previously we decided not to create default MIDlet, we need to create it manually. Thanks to NetBeans, it is extremely simple. Simply click right button on (
package mygame;

import javax.microedition.midlet.*;
import javax.microedition.lcdui.*;

public class MyGameMIDlet extends MIDlet {

public void startApp() {
}

public void pauseApp() {
}

public void destroyApp(boolean unconditional) {
}
}
The first method startApp() is called by Application Management Software (AMS) when MIDlet starts or it is being resumed. Since it is invoked after resume, it is clear that it can be executed more than once. For this reason it is important to control how new objects are initialised in this part of the code, as there is a risk of initialising object more than once.
The next mandatory method is pauseApp(). It is invoked by AMS in situation such as user receiving a phone call during the game, low battery warning etc. and can be used to minimise CPU, memory or even a power consumption, when application is not in the active state. It is important to remember that pauseApp() is not always called when MIDlet is going into background (loose focus), as it is on Series 60 phones. In such situation MIDlet should detect when application is not in focus and call notifyPaused() method.
The last mandatory method is destroyApp(). This method is called to destroy MIDlet by AMS to prepare MIDlet for termination. It should execute clean-up actions releasing resources etc. and notify AMS about completion of cleanup tasks with notifyDestroyed().
These three methods are part of something called MIDP Lifecycle. It is very important for every J2ME programmer to know this subject well, thus I refer to the PDF document Programming the MIDP Lifecycle on Symbian OS that explains it in details and provides information on mistakes that should be avoided by newbie J2ME programmers. I also strongly recommend reading MIDlet Lifecycle Article on Sun Developers web-site.
Base on information mentioned in these guidelines, our implementation of MIDP lifecycle in the MyGameMIDlet.java looks as follow:
package mygame;

import javax.microedition.midlet.*;
import javax.microedition.lcdui.*;

public class MyGameMIDlet extends MIDlet {
    private final static int PAUSED = 0;
    private final static int ACTIVE = 1;
    private final static int DESTROYED = 2;

    private int stateTracker = PAUSED;

public void startApp() {
       stateTracker = ACTIVE;
}

public void pauseApp() {
       stateTracker = PAUSED;
       notifyPaused();
}

    private synchronized void performDestroyCleanup() {
        if (stateTracker != DESTROYED) {
            stateTracker = DESTROYED;
            notifyDestroyed();
        }
    }

public void destroyApp(boolean unconditional)
  throws MIDletStateChangeException {
       performDestroyCleanup();
}
}
Beside MIDlet, one more Java Class will be required, a GameCanvas. This is a special class that will handle game-specific features such as efficient graphics or game control with keys pressed by the user. For those one unfamiliar with GameCanvas I recommend to read the Game Canvas Basics article followed by Using GameCanvas in MIDP2.0.
We can add this class to our project by right-clicking on the package (mygame or
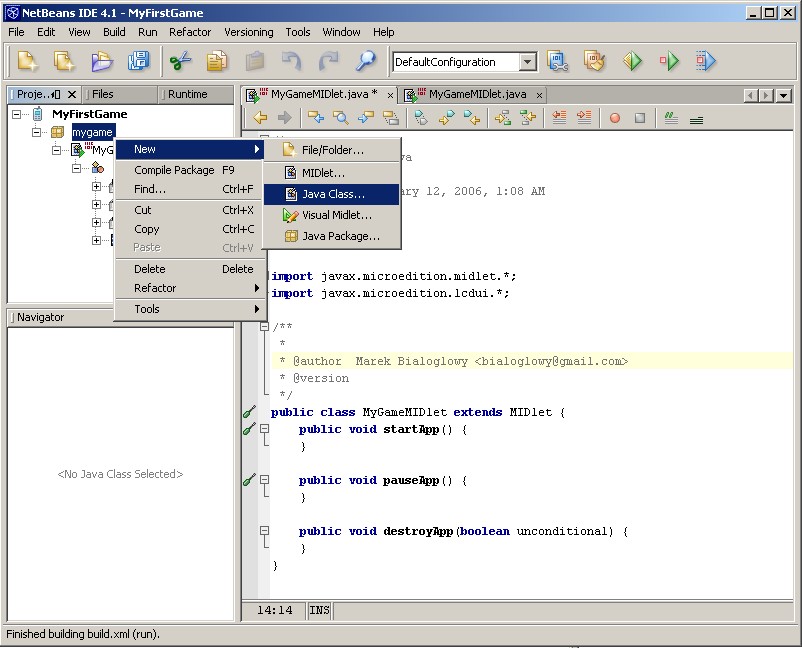 Figure 4. Creation of New class used for GameCanvas.
import   javax.microedition.lcdui.Graphics;
import   javax.microedition.lcdui.Font;
import   javax.microedition.lcdui.game.GameCanvas;
Their functions are as follow: javax.microedition.lcdui.Graphics (provides simple 2D geometric rendering capability); javax.microedition.lcdui.Font (provides fonts capability); javax.microedition.lcdui.game.GameCanvas (introduced in MIDP-2.0, provides gaming features).
public class MyGameCanvas
as follow:
public class MyGameCanvas extends GameCanvas
 implements Runnable {
Use of GameCanvas, also requires us of super() to suppress the normal key event mechanism, inherited from the Canvas class, as we do not require these notifications in our MyGameCanvas. Finally, implementation of Runnable interface for the purpose of tasks (read more here) requires us to add one more method called run(). The modified basic MyGameCanvas.java code looks as follow:
package mygame;

import javax.microedition.lcdui.Graphics;
import javax.microedition.lcdui.Font;
import javax.microedition.lcdui.game.GameCanvas;

public class MyGameCanvas extends GameCanvas
        implements Runnable {

public MyGameCanvas() {
     super(true);
}

    public void run() {

    }

}
Game loop
Every game is build with the same concept of repetitively executed code that modifies graphics, resulting in animation and game action. Thus, in next step we need to create a primary game loop.
Such game loop will require creation of a new thread, starting the thread, within the thread executing all the actions and repating these actions with specified time delay. To organise the code better, we also added custom startGame() and stopGame() methods. The startGame() method will be used to execute the thread, which will then call run() and go into the game loop. The stopGame() method will be used to stop the thread. The delay between repeating tasks in the loop can be easily done with Thread.sleep(milisecond), which will sleep a thread for a specified number of milliseconds, before repating the actions and creating a next frame of the game.The modified MyGameCanvas.java code looks as follow:
package mygame;

import javax.microedition.lcdui.Graphics;
import javax.microedition.lcdui.Font;
import javax.microedition.lcdui.game.GameCanvas;

public class MyGameCanvas extends GameCanvas
 implements Runnable {

public long GameFrameDelay = 30;

Thread thread = new Thread(this);

public MyGameCanvas() {
super(true);
}

public void startGame() {
  thread.start();
}

public void stopGame() {
  thread = null;
}

public void run() {

   while ( true ) {

      try { Thread.sleep(GameFrameDelay); }
      catch (InterruptedException ie) {
            stopGame();
      }

   }

}

}
At this stage we have finished our game loop. However, if we run (press F6) the MIDlet, we will not see any game canvas or any graphics. You probably wonder why? The answer is very simple, it is because we haven’t linked MyGameCanvas with MyGameMIDlet. To do it we need to start MyGameCanvas thread from MyGameMIDlet and link the canvas.
package mygame;

import javax.microedition.midlet.*;
import javax.microedition.lcdui.*;

public class MyGameMIDlet extends MIDlet {
private final static int PAUSED = 0;
private final static int ACTIVE = 1;
private final static int DESTROYED = 2;

private int stateTracker = PAUSED;

    private Display mygameDisplay;
    private MyGameCanvas mygameCanvas;

public void startApp() {
       if (mygameCanvas == null) {
            mygameCanvas = new MyGameCanvas();
            mygameCanvas.startGame();
        }
 mygameDisplay.getDisplay(this).setCurrent(mygameCanvas);
 stateTracker = ACTIVE;
}

public void pauseApp() {
stateTracker = PAUSED;
notifyPaused();
}

private synchronized void performDestroyCleanup() {
 if (stateTracker != DESTROYED) {
     stateTracker = DESTROYED;
     notifyDestroyed();
 }
}

public void destroyApp(boolean unconditional)
throws MIDletStateChangeException {
performDestroyCleanup();
}
}
If we run our project in the emulator (F6), it will only produce a blank screen. This is simple because we haven’t added any graphic to MyGameCanvas code, yet.
Adding Graphics to MyGameCanvas
Now, let’s try to make our application display some graphics during the game loop. The beginning step would be creating a background for our graphics. To keep it simple we will fill up the screen with one solid colour. The simplest method to do so is to create a coloured rectangle that fits the size of the screen. To create such rectangle, we need to first create an object that will be used for graphic operations using getGraphics() method. As next step, we need to get the width and height of the mobile device screen using getWidth() and getHeight(). With this information we know dimension of the rectangle required to cover all the space of the screen. Now only need to set the drawing colour using Graphics method setColor() and fill the canvas with rectangle using fillRect() method, with a dimensions set to cover the screen.
The rectangle is created on game canvas. However, if you run the project the rectangle will not appear on the mobile device screen yet. To do so we still need to flush all the graphics changes on the screen. For this purpose we can create a custom method called paintScreen() (name it whatever you like) that calls flushGraphics() method, resulting in graphic changes appearing on the screen.
The modified part of the MyGameCanvas.java code looks as follow:
...

public void run() {

   Graphics g = getGraphics();

   int scrWidth = getWidth ();
   int scrHeight = getHeight();

while ( true ) {

        g.setColor(0x00ff00);
        g.fillRect(0, 0, scrWidth, scrHeight);

        paintScreen(g);

      try { Thread.sleep(GameFrameDelay); }
     catch (InterruptedException ie) {
         stopGame();
     }

}

}

    protected void paintScreen(Graphics g) {
        flushGraphics();
    }

...
If we run the MIDlet a green (0x00ff00 in hex) background should appear on the screen. After checking it you will probably quickly notice one problem that is lack of ability to close midlet by the user. For this purpose we need to add Exit command to our game canvas. This will require implementation of CommandListener, creation of a new exitCommand command and adding command to the mygameCanvas with addCommand method. Additionaly, we will also need to create commandAction()method that will handle command actions. Additionally, we need to make a small change to startApp() to provide us with control on the state change exceptions. Modified MyGameMIDlet.java looks as follow:
package mygame;

import javax.microedition.midlet.*;
import javax.microedition.lcdui.*;

public class MyGameMIDlet extends MIDlet
  implements CommandListener {
private final static int PAUSED = 0;
private final static int ACTIVE = 1;
private final static int DESTROYED = 2;

private int stateTracker = PAUSED;

Command exitCommand = new Command("Exit",Command.EXIT,2);

private Display mygameDisplay;
private MyGameCanvas mygameCanvas;

public void startApp()throws MIDletStateChangeException {
if (mygameCanvas == null) {
   mygameCanvas = new MyGameCanvas();
   mygameCanvas.startGame();
  mygameCanvas.addCommand(exitCommand);
  mygameCanvas.setCommandListener(this);
}
mygameDisplay.getDisplay(this).setCurrent(mygameCanvas);
stateTracker = ACTIVE;
}

public void pauseApp() {
stateTracker = PAUSED;
notifyPaused();
}

private synchronized void performDestroyCleanup() {
 if (stateTracker != DESTROYED) {
     stateTracker = DESTROYED;
     notifyDestroyed();
 }
}

public void destroyApp(boolean unconditional)
throws MIDletStateChangeException {
performDestroyCleanup();
}

public void commandAction(Command c, Displayable s) {
if (c.getCommandType() == Command.EXIT) {
try {
     destroyApp(true);
  } catch (MIDletStateChangeException ex){ }
}
}

}
Keypad based game control
package mygame;

import javax.microedition.lcdui.Graphics;
import javax.microedition.lcdui.Font;
import javax.microedition.lcdui.game.GameCanvas;

public class MyGameCanvas extends GameCanvas
 implements Runnable {

public long GameFrameDelay = 30;

String txt = new String("Hello. Press Keys.");

Thread thread = new Thread(this);

public MyGameCanvas() {
super(true);
}

public void startGame() {
thread.start();
}

public void stopGame() {
thread = null;
}

private void processKeyStates() {
 int keyState = getKeyStates();
 if ((keyState & UP_PRESSED) != 0) {
txt = "Key: UP";
}
 if ((keyState & DOWN_PRESSED) != 0) {
txt = "Key: DOWN";
}
 if ((keyState & LEFT_PRESSED) != 0) {
txt = "Key: LEFT";
}
 if ((keyState & RIGHT_PRESSED) != 0) {
txt = "Key: RIGHT";
}
 if ((keyState & FIRE_PRESSED) != 0) {
txt = "Key: FIRE";
}
}

public void run() {

Graphics g = getGraphics();

int scrWidth = getWidth ();
int scrHeight = getHeight();

   Font myfont = g.getFont();
   myfont = Font.getFont(Font.FACE_SYSTEM,
                          Font.STYLE_BOLD,
                          Font.SIZE_MEDIUM);

   int fontHeight = myfont.getHeight();
   int fontWidth = myfont.stringWidth(txt);

   g.setFont(myfont);

while ( true ) {

 g.setColor(0x00ff00);
 g.fillRect(0, 0, scrWidth, scrHeight);

 processKeyStates();

 g.setColor(0x990000);
 fontWidth = myfont.stringWidth(txt);
 g.drawString(txt, (scrWidth - fontWidth)/2,
          (scrHeight - fontHeight)/2, g.TOP|g.LEFT);

 paintScreen(g);

     try { Thread.sleep(GameFrameDelay); }
     catch (InterruptedException ie) {
         stopGame();
     }

}

}

protected void paintScreen(Graphics g) {
 flushGraphics();
}

}
The result of running the final code in the emulator is a green background with welcome text changing base on the user input, as seen below:
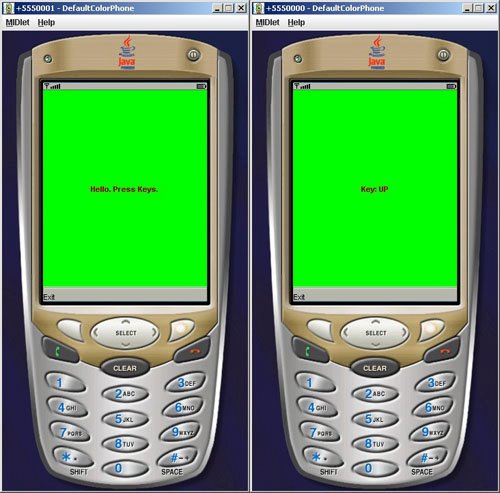
Figure 5. Final template running in emulator.
Now, the only task left is to Clean and Build Main Project (Shift + F11) [Figure ].

The generated file MyFirstGame.jar can be uploaded to the mobile phone via Bluetooth, installed and launched. Below screenshot shows MIDlet running on my SE-P900 phone.
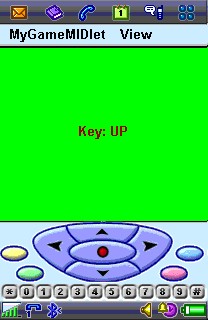 Figure 7. Final MIDlet runnign on SE-P900 phone.
Conclusion
Thanks to NetBeans IDE and J2ME technology, mobile game development is trivial. With less than 100 lines of Java code we were able to create a MIDlet that displays text and graphics, can be controlled from mobile phone keypad and integrates with phone Application Management Software (AMS). We were also able to quickly verify the result thanks to emulator, which can be launched from NetBeans with a click of a button. Finally, with another click of the button we were able to clean the code, build it and run the generated JAR file on a mobile phone. Clearly, creating a basic mobile game is not as difficult as you may previously have thought.
 Figure 8. Main characters of our game.
13 comments:
I corrected grammar and wording in the text, yet I still think it should be improved. If you see sentence that sounds unclear, or noticed some nasty example of my poor non-native English, please let me know.
this is very usefull tutorial. we are waiting for next one :-)
Hi,
Those of you interested in fast J2ME development might have a look at the Hecl programming language here:
http://www.hecl.org
It's probably not suitable for apps where you need raw speed (games), but if you just need some simple forms, it's a great way to get something built fast.
hi,
this is awesome! from this I got an idea about the NetBeans. thanks for this information. Do u have any help documentation of J2ME like msdn of visual studio. the help doc should be interactive enough. If u have then plz send it to me.
my id is ashisht4u@gmail.com
Great article!!!Can't wait for part 3.When will it be out?
Sorry guys, I'm pretty stuck with my projects. I'll try to finish part 3 sometime this month.
This was exactly what I was looking for as a beginner of J2ME. Thanks a lot
thanks for your article!it really useful for me...i learned gaming in just a short time, that's why i made my school projects!thanks a lot...
Great work...i realy thankfull to u,for such a good documentation....
Thank you!!! Great for beginners!
Hi Guys,
Nice tutorial. If any of you guys are looking for Game development and worried about creating animations, Motion Welder can help you with that.
Love to read part 3!
your article helped me on netbean. thanks
looking forward for next part.
Post a Comment